Showing posts with label Baking. Show all posts

Sunday, March 4, 2012

Memories of Grandma Lela - Mamoul, Maamoul (Syrian Date Cookies)

Some of the things that remind me of my Grandma Lela are her sewing, crocheted slippers, embroidery and her Syrian Date Cookies (aka Mamoul or Maamoul). She would always make them, put them in a tin and bring with her on the airplane when she came to see us.
Grandma Lela (Wasn't she beautiful?)
Today I decided to make some so I thought I would share "how to" with everyone. They are nummy.

There are many versions of the receipe out there on the web. Some use semonila flour and yeast. I use a simpler version using white flour.

First you will want to gather the ingredients:

1 3/4 Cups of Flour
1 1/2 Sticks Unsalted Butter cut into small pieces
3 tsp Orange Flower Water or Rose Water - (or 1/2 & 1/2 of each.. that's what I did)
2 TBSP Milk
Filling:
1/2 pound pitted dates (or I found baking dates in the Middle Eastern Store. It's already a jam/paste consistency so you can skip the step below to make the filling.)
3 TBSP Water

Directions:
1. Heat oven to 350 degrees.
2. Line a cookie sheet with parchment paper.

To prepare the filling if you can't find the baking dates:
1. Put pitted dates and water in a saucepan over low heat. Bring to a simmer, reduce and stir often until the consistency is thick and jam-like. Spread the filling on a plate or shallow bowl to cool.

To make the dough:
1. Put the flour in a mixing bowl
2. Cut up the unsalted butter into small pieces (mine was frozen so it broke up nicely.)
4. Add the butter to the flour and use a pastry cutter to blend w/ flour until a crumbly consistency (or use a food processor.)
5. Sprinkle Orange and/or Rose Water & milk over flour/butter and blend just until the dough forms a ball.

To prepare the cookies:
1. Break off a piece of the dough and make a ball (you will want to make yours smaller than the one pictured below.)
2. Use your thumb or index finger to make an indentation in the ball of dough.
3. Expand the indentation to make the dough a small cup shape.
4. Put a small teaspoon full of filling inside and pinch the dough closed.
5. Now with this step if you do not have a mold you would place the cookie seam side down on a cookie sheet lined with parchment paper. Leave about 1 inch between each and use a fork to flatten a little & make decorative edges. If you have a mold see the directions continued below.

To shape the cookie in the mold:
1. Dust the mold with flour.
2. Place the dough ball into the mold and press firmly. Try to keep it as flat on the bottom & even with the top of mold (I had too much in the one that was photographed. I got better as I went along guessing how much to use for each cookie.) When done tap firmly on counter to expel the cookie and place on the baking sheet about 1 inch apart.

To Bake & Finish:
1. Bake for 20 minutes in a 350 degree oven. Do NOT let them brown. They should remain very white. Since there is no sugar added to the dough there should be very little carmelization. (The photo below is them heading INTO the oven.)
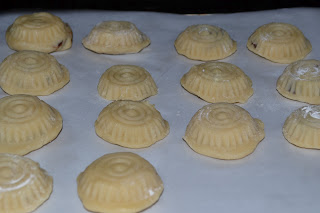
2. Remove from oven and cool on the pan placed on a wire rack. Once cooled dust with powdered sugar.

Eat & enjoy.... Grandma's comfort food at its finest. 

Wednesday, January 27, 2010

There's a Reason They Call It Sin Cake

Ok here's the recipe for Jessica's Sin Cake I made on Sunday and wrote about in this post: Even Better When I Don't Have to Cook Twice In One Day 

Sin Cake

Crust:
Take 2 sticks of butter (softened), 1 1/2 cups flour, & 1 cup chopped nuts (I used almonds). Mix together until all blended and press into the bottom of a 9x13 inch baking dish. Bake the crust for 15-30 minutes until light brown at around 350 degrees.

2nd Layer:
1- 9oz container of cool whip, 1-8oz pkg of cream cheese (softened), 1 cup powdered sugar. Mix together and spread over cooled crust.

3rd Layer:
3pkgs of Butterscotch Instant Pudding, 4 cups cold milk. Mix together for 3 to 4 minutes making sure you mix well. Pour on top of the 2nd Cream Cheese layer & spread out.

Top with either another layer of cool whip or I topped with a layer of real Whipped Cream since I don't care for cool whip all by itself.

Refrigerate for one hour or so.

*Warning... I served normal pieces about how large one would when serving a cake. No one could finish all of their piece (except Hunter) because although it is very good it is also very rich... In the future I would serve half the amount you normally would serve. People can always have seconds if they want more.

If you make this please leave a comment of how it turned out for you and what you thought of it.

Sunday, January 17, 2010

Does the Woman Have a Single Bad Recipe?

I have a friend, JoAnne, who I've gotten quite a few recipes from. Every single one so far has been in the "Totally Evil" or "Beyond Great" categories. I promise you poor souls who had my under-cooked "JoAnne's Evil Potatoes" for Thanksgiving that one day I'll make them again the way they should be and you will see.

My mom cooks really good too but when I eat one of JoAnne's recipes it makes me wish I was one of her kids growing up.

Here's the newest one she passed on last week and I made it on Saturday during my "girls weekend" trip to Lake Coeur d'Alene with my daughter Madeleine & my friends daughter, Megan.

I'm calling it:
"JoAnne's To Die for Macaroni N' Cheese"

1. Start by cooking 1 pound of elbow macaroni until "el dente", drain & set aside.


2. Cut the crust off of white bread and line a very large baking dish (I ended up needing one large 9x13 pan and another 8x8 pan to fit it all)


3. Melt 8 Tablespoons of butter in Microwave then brush all over the bread. (YES this is one entire cube of butter.)  


4. Take the crusts & spread on a cookie sheet & put into a 200 degree oven until nice & dry. I deviated from JoAnne's recipe here and sprinked the crusts with a bit of Garlic Powder (Because incase you guys don't know it yet I happen to think there is no such thing as too much garlic in anything.) 
 

5. Put 5 1/2 cups of WHOLE milk into your pot and don't try to make it with skim milk. You just got done brushing all the bread with one cube of butter. Don't you think skim milk is pointless by now? (Also, make the pot a large one)
 

6. On a lower heat setting warm the milk a bit then slowly add 1/2 cup flour as you whisk to prevent lumping (you can also use another thickening agent like corn starch etc). 

7. Add 1/4 tsp White Pepper (you can use regular black pepper if you don't have white), 1/4 tsp Cayanne Pepper & 1/4 tsp Nutmeg
 

8. To the milk, flour, spice mixture you add 4 1/2 cups of White Cheddar (I used Tilamook Vintage White). Now I didn't want to shred it all so here was my conversion... 8 oz to a cup... so basically I just cubed up an entire two pound block of it and put it into the pot. I could be totally off but it turned out great anyway.

9. Add 1 cup Swiss & 1 Cup Romano


10. Keep stirring over low to medium heat until the cheese is melted & everything is mixed creamy together.
 
(Still lumpy.. keep stirring so it won't scorch)


11. When it's all mixed and creamy mix in your elbow macaroni.

12. Pour the mixture into the white bread lined baking dish (or dishes).
 

13. Crumble up your dried out bread crusts to make coarse bread crumbs.
 

14. Sprinkle breadcrumbs over the macaroni mixture
 

15. Put pans into a 350 degree oven for 30 to 45 minutes until bubbly & browned on top.
 

Sorry, I forgot to snap a picture right when it came out of the oven but here's part of one dish after we ate some for dinner.
 

If anyone makes this dish please post a comment on how it went for you and if you liked it. I'd love to hear from you!
~Jamie

Saturday, December 26, 2009

Roxanne was right - No-Knead Bread = Evil

Ok Roxanne was totally right. I made the recipe that she suggested for No-Knead Bread and I tell you it's so easy and it tastes GREAT!

Here's the recipe link for anyone that missed it.

My gosh the stuff is just evil I tell you....

For you non bakers out there here's how it's done... Just try it, I swear you will LOVE it, and it is super easy to make.

1. Start by taking  3 Cups of All-Purpose flour and put it into a mixing bowl. (I haven't perfected my whole wheat version yet so I"ll let you know when I get the perfect loaf on that.)
2. Add 1/4 tsp rapid rise yeast to the flour. (You can use regular yeast - just use more like 1/2 tsp to 3/4 tsp)
3. Add 1 1/4 tsp salt to the flour.
4. Mix together until blended then make a well in the center and add just a little bit shy of 2 cups water. Mix it all up. You may need to add more water.... What you want to end up with is something that resembles a really thick pancake batter (see photo below).


I did the above steps on Christmas afternoon.

5. Now what you do is cover the bowl with plastic wrap and let it sit for 12 to 18 hours. It is ready to move to the next step when the top is all bubbly (see next two photos since I did two batches).


6. Lightly flour a work surface and place dough on it; sprinkle it with a little more flour and fold it over on itself once or twice.
 

7. Cover loosely with plastic wrap and let rest about 15 minutes.


(Now I'm going to honestly tell you that I have omitted the turning it over on itself and cover with plastic wrap step and just moved on to the next one below. It turned out fine and because the dough is so sticky and tacky it's a lot less messier.)

This next step is a deviation from the original recipe. Roxanne found the suggestion online and it's much easier and works great.

8. Line a bowl with parchment paper.


 9. Pick up the dough off the counter and put into lined bowl (or if you are skipping the counter part just dump the dough into the lined bowl)


10. Cover loosely with a cotton towel.

11. Let rise until double in size - About 2 hours.


11. About 30 minutes before baking time put your dutch oven or any other pot (with a lid) that can go up to 500 degrees into your oven and turn it on to 450 degrees f.

12. Once the dough has risen and your pot, lid & oven are 450 degrees F, pick up the parchment paper with the dough inside gently and put it into the hot pot.


13. Put the lid on and bake for 30 minutes.

14. Then remove the lid and bake for another 15 to 30 minutes until the loaf is beautifully browned.

15. Remove from hot pot and cool on wire rack as long as you can stand to not just cut off a piece and eat it.


I don't know about you but I love the smell when making bread...

If you try this please post your comments... tell me how it turns out for you and if you like it as much as we do.
~Jamie

Friday, December 25, 2009

Test run #2 (Christmas Morning) - Breakfast & a Trip to Canada

Our test run number two was Christmas breakfast with Grandma & Grandpa. Dakota & Maddie set the table and got it right this time. We had scrambled eggs, bacon, sausage patties & waffles.

Here's a photo Grandma just posted up on Facebook:


(In photo viewing left to right as seen in the picture- Hunter, Dakota, Jamie, Grandma Jeannie, Madeleine, Papa Earl)

After we ate we opened presents and ate candy from the stockings while two of the three cats were lounging around.

(Miss Molly)

(Kasey Kahne)

And here's more photos that Grandma took with her remote controlled camera:

(Hunter & Dakota)
(Hunter, Dakota & Grandma Jeannie)
(Dakota & Grandma Jeannie)
(Dakota & his Aircraft Carrier)
(Group Shot)
(Another Group Shot)
(Maddie & Grandma Jeannie)
(Another shot of Maddie & Grandma Jeannie)
(Maddie & Papa Earl)

Now my favorite picture... Grandma Jeannie & Papa Earl gave me the Red Lantern lights for my birthday... SO VERY COOL!!! Can you tell I really like them?

Here's a better shot of one:

After Grandma & Grandpa left I got a bug up my rear and decided that I wanted to drive to Canada so I could say I was in another country for Christmas. Hunter drove with me on a nice & sunny (but colder) Idaho afternoon. I dropped him off at the Porthill Mercantile to wait for me since he doesn't have a passport.

The Canadian border patrol agent thought it was humorous. When she asked what the purpose of my visit was and how long I would be in Canada, I said "I'll be here for no more than 15 mintues. I want to go up and turn around so I can post on Facebook that I was in another country for Christmas."


The U.S. agent didn't find it as funny coming back. It's not like the border was busy, there was only one car in front of me and no one behind me. They were so slow that she asked me to turn off my motor and pop my hood so the two guys standing outside of the little booth could check under my hood. Isn't it sweet & nice that they check your oil for you? They did the same thing for the car in front of me... but this lady was kinda grumpy. Maybe I was interupting a good book she was reading or do you think they train them not to smile or something?


On the drive up and drive back home we saw some amazing views. Isn't North Idaho just beautiful? Just in case I haven't mentioned it lately... I LOVE IT HERE!


Once we got home I started two batches of the No-Knead Bread recipe below. Here's a photo of the dough mixed up and ready to sit around for 12-18 hours. I'll be actually baking them tomorrow for us to have with dinner.


So far it has been a nice & relaxing Christmas Day which is exactly what I wanted. Tonight's dinner will be Ribs but I'm not sure if we are going to do a sit down dinner or just a free for all... It may, or may not be, test run #3 but if it is I'll post up later.

Here's some shots of Hunter helping me make the ribs.


Merry Christmas everyone. I hope you all have a blessed day.

~Jamie